
10 Easy Birthday Party Crafts Kids Can Make and Take Home
· Craftiverse Editorial Team
Ten fully illustrated party craft tutorials, a realistic plan for choosing one, and a supply calculator for 6 or 12 children. Includes a free party preparation sheet.
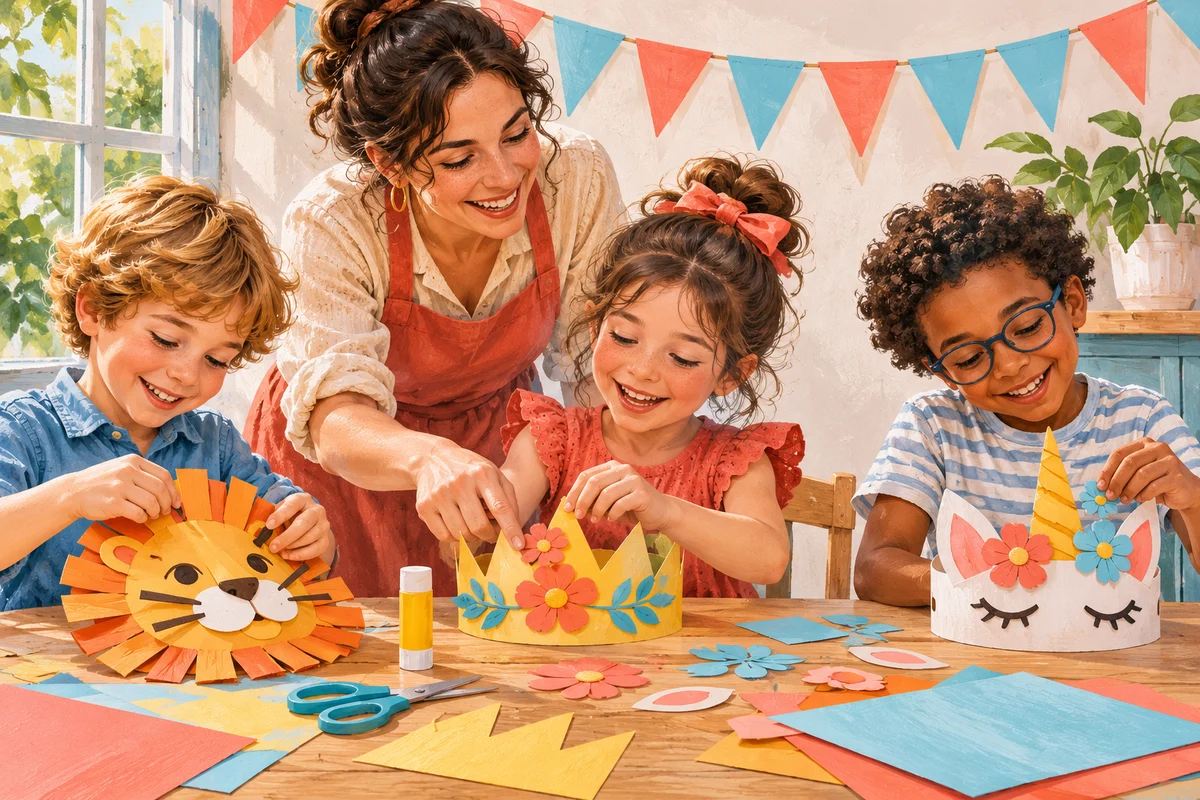
Illustration created for Craftiverse; the scene is illustrative.
Decorated paper crown
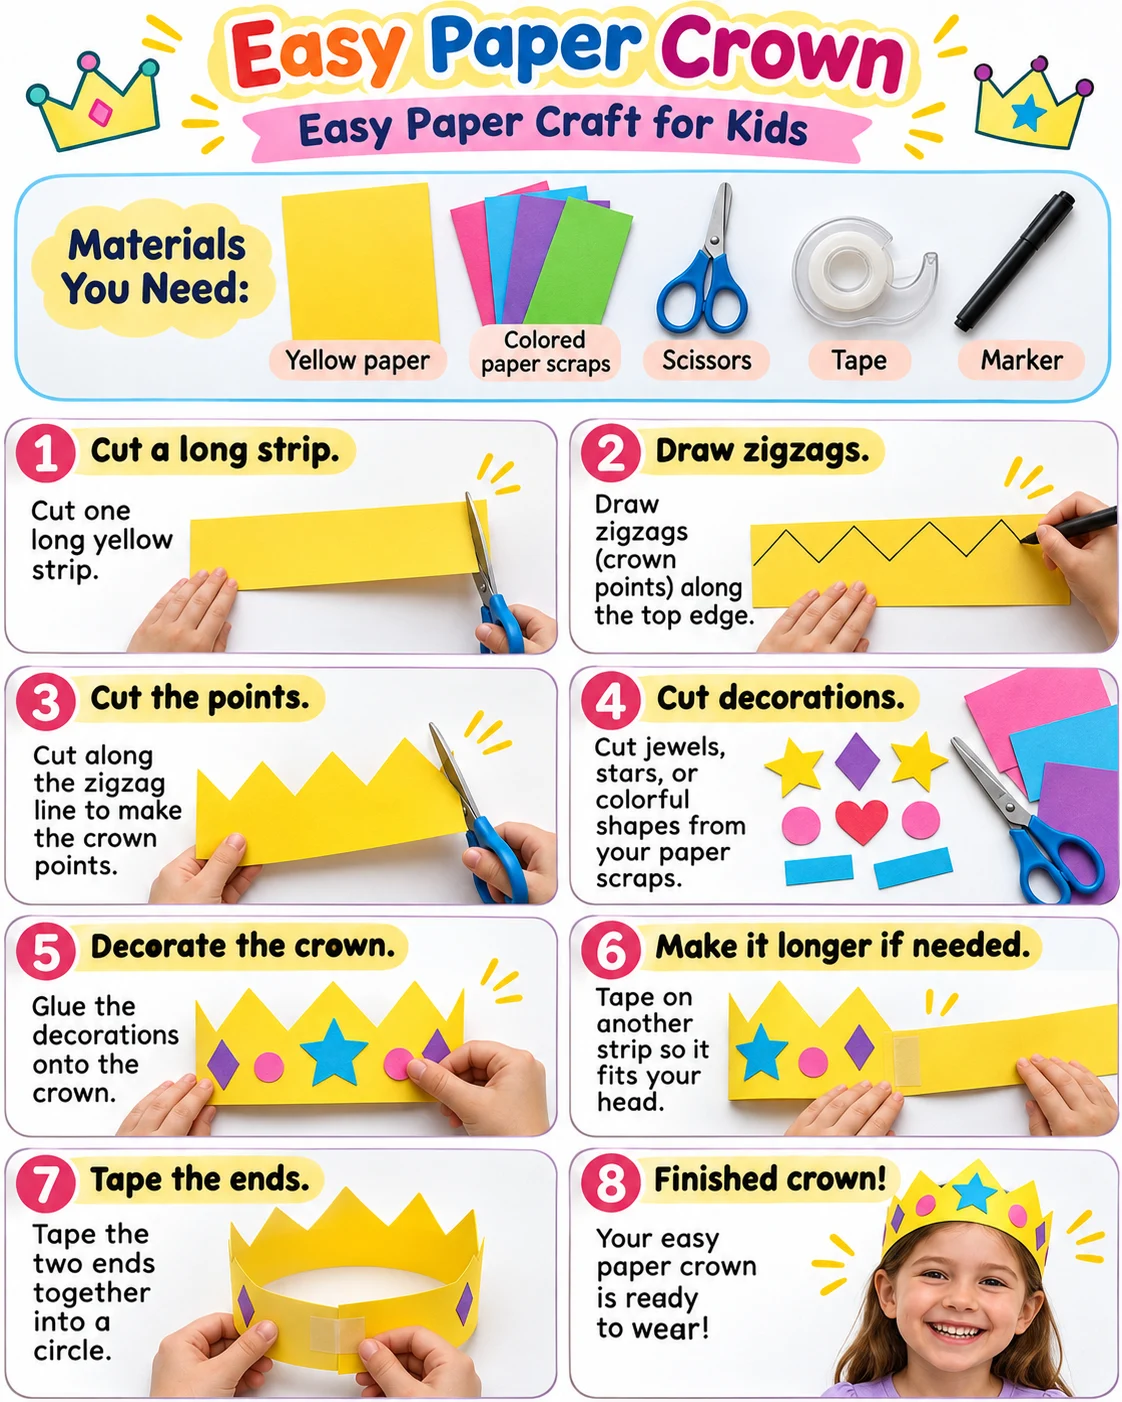
Materials
- Yellow and colored paper
- Scissors
- Glue
- Tape
- Marker
How to make it
- Cut a wide strip of yellow paper and draw zigzags along one edge.
- Cut out the points and decorate the front with paper shapes.
- Add another strip if the crown needs to be longer.
- Wrap it around the head to check the fit, then remove it and tape the ends together.
Paper monster corner bookmark
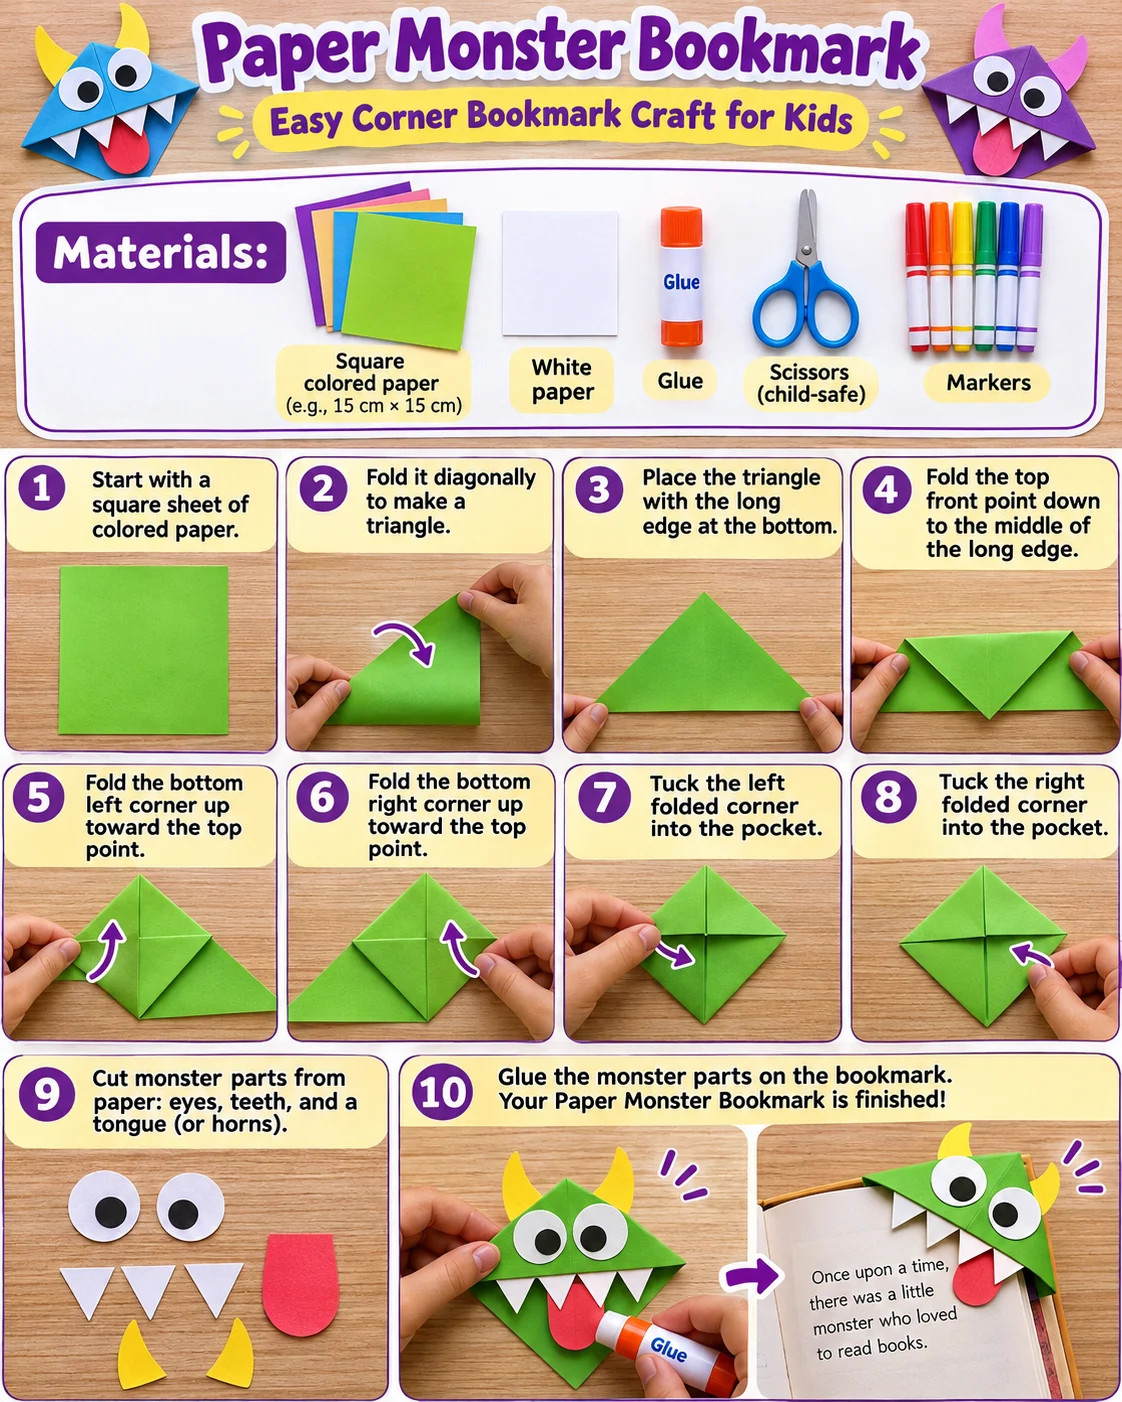
Materials
- Square colored paper
- White paper
- Scissors
- Glue
- Markers
How to make it
- Fold the square diagonally into a triangle.
- With the long edge toward you, fold both outer corners to the top point and crease. Open those folds.
- Fold the top layer of the upper point down to the middle of the long edge to form a pocket.
- Fold the two outer corners up again and tuck them into the pocket.
- Glue on paper eyes and teeth. Slip the bookmark over a page corner.
Colorful paper fish
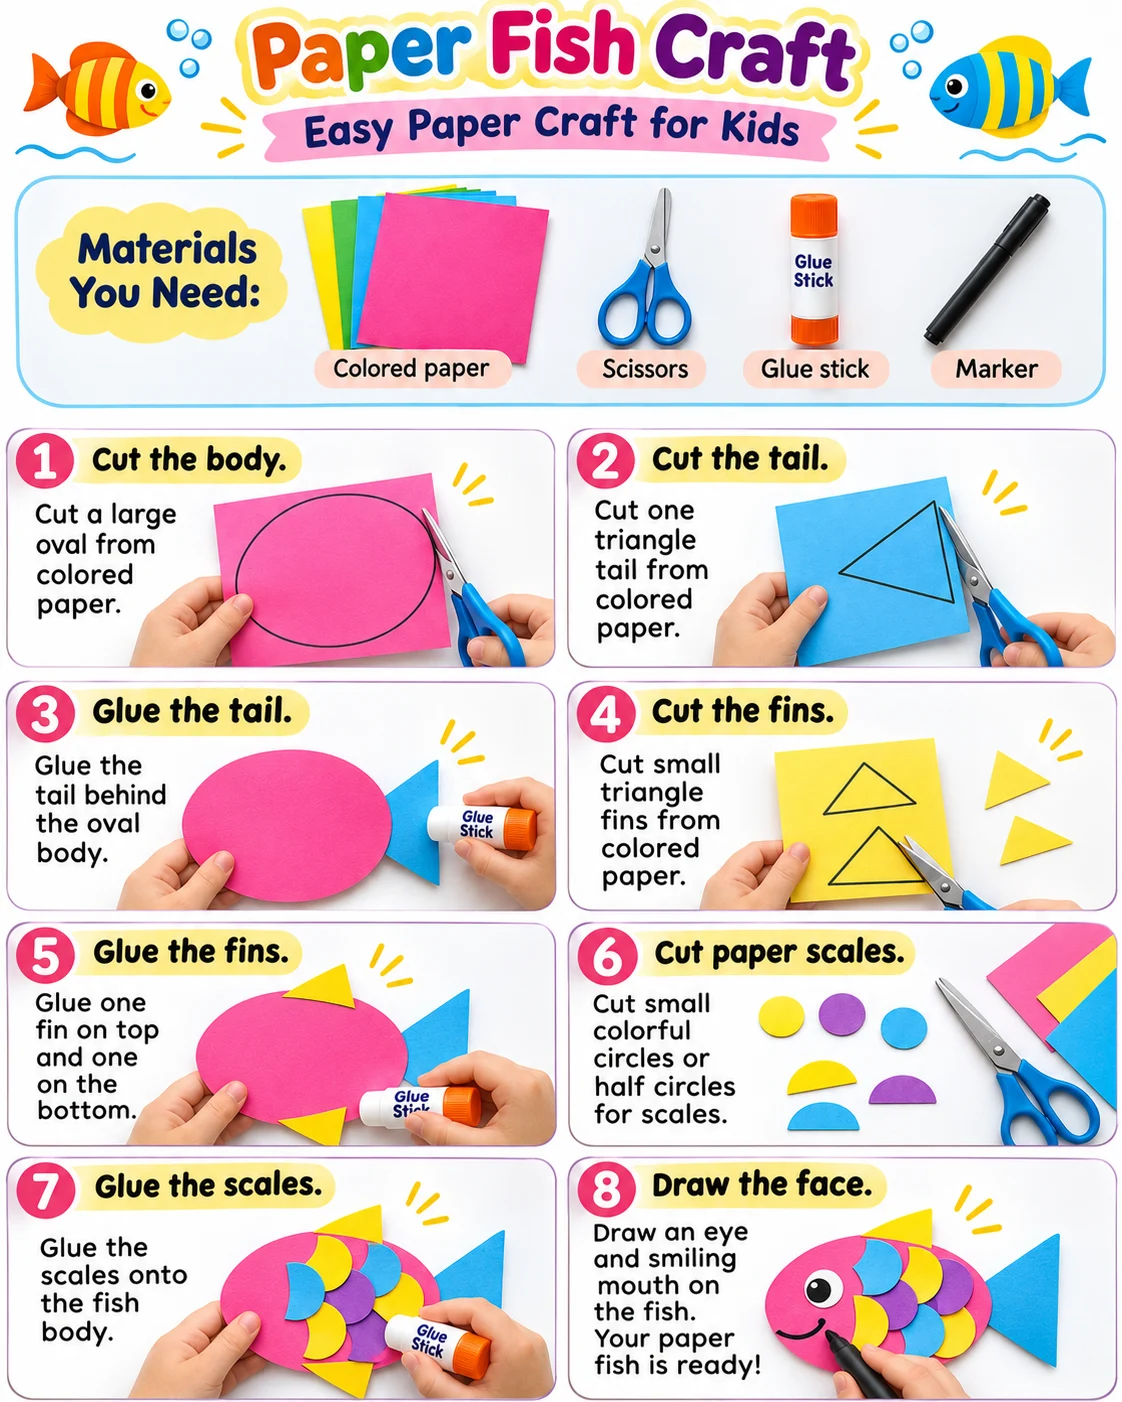
Materials
- Colored paper
- Scissors
- Glue
- Marker
How to make it
- Cut a large oval for the body and a triangle for the tail.
- Glue the tail behind the body and add two small fins.
- Cut colorful circles or semicircles and overlap them across the body to make scales.
- Add an eye and draw a mouth.
Folded paper fox face
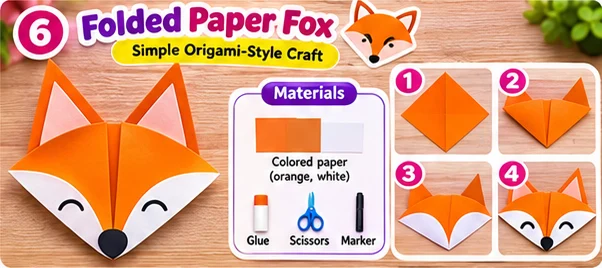
Materials
- Square orange paper
- White paper
- Scissors
- Glue
- Marker
How to make it
- Fold the orange square diagonally into a triangle.
- Hold it with the point down. Fold the side corners upward to form pointed ears.
- Cut two white cheek shapes and glue them along the lower edges.
- Draw closed eyes and add a dark nose at the bottom point.
Looped paper butterfly
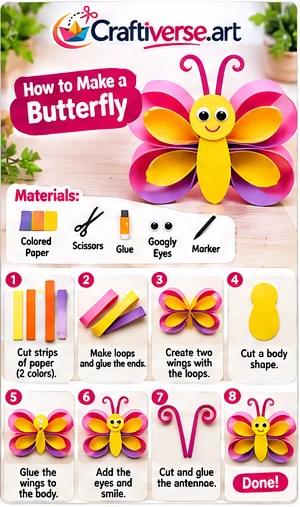
Materials
- Colored paper
- Scissors
- Glue
- Marker
How to make it
- Cut strips in two colors and glue the ends of each strip together into a loop.
- Nest a smaller loop inside a larger one to form each wing.
- Cut a paper body and glue two wings on either side.
- Add eyes, a smile and two curled antennae.
Cut-paper owl
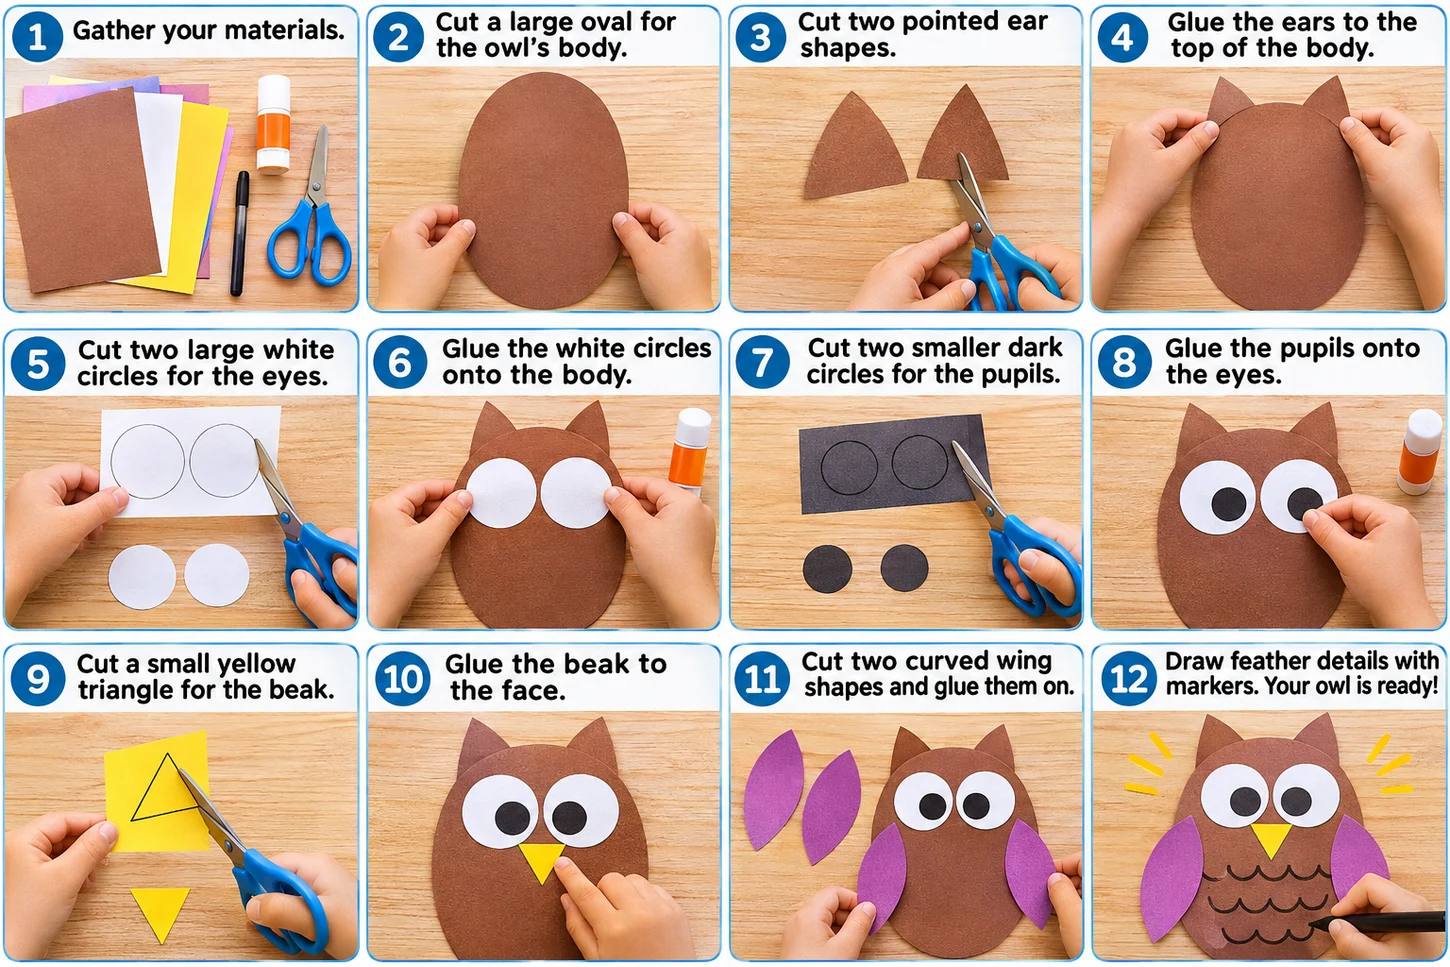
Materials
- Brown, white, yellow and colored paper
- Scissors
- Glue
- Marker
How to make it
- Cut an oval body and two pointed ears from brown paper.
- Glue the ears behind the top edge, then add two big white eyes with dark pupils.
- Cut a small yellow triangle for the beak and glue it between the eyes.
- Add two paper wings and draw feathers.
Paper house collage
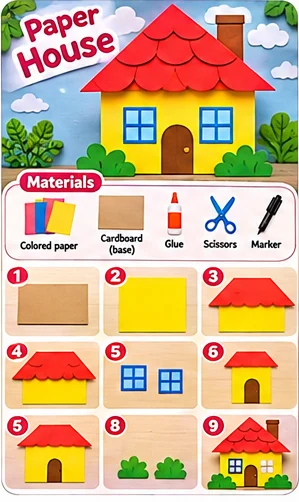
Materials
- Cardstock
- Colored paper
- Scissors
- Glue
- Marker
How to make it
- Cut a large rectangle for the wall and a triangle for the roof.
- Glue the shapes to cardstock and add a chimney.
- Cut a door and windows and glue them to the house.
- Add paper roof tiles, clouds and plants.
Paper bag dinosaur puppet
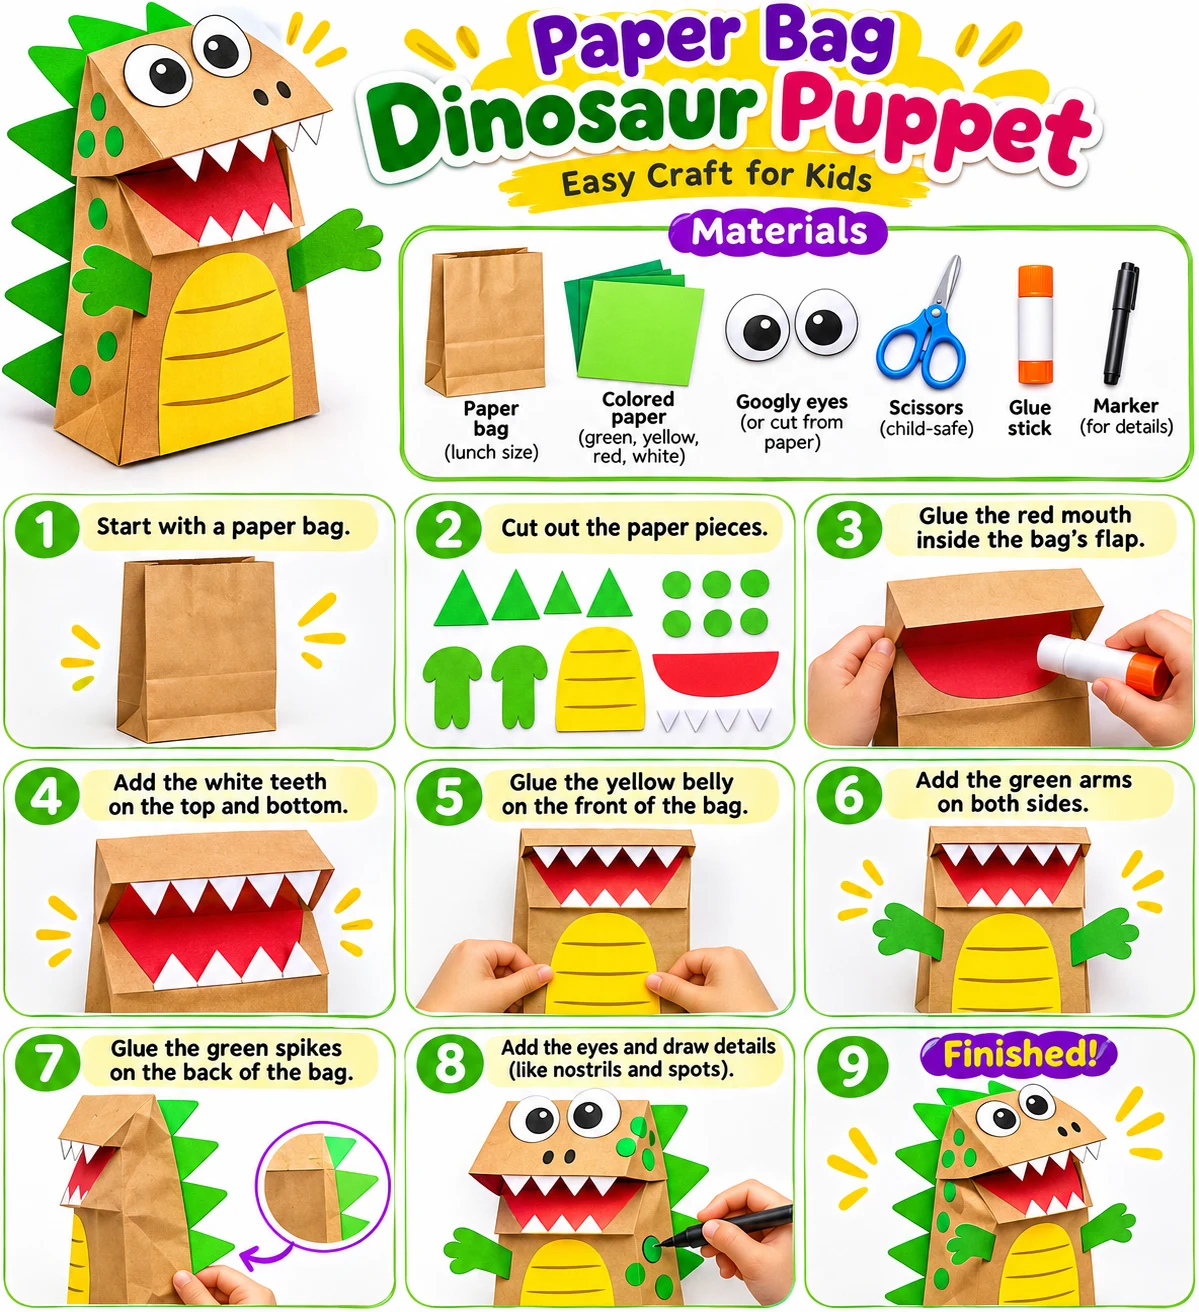
Materials
- Paper lunch bag
- Green, yellow, red and white paper
- Paper eyes or googly eyes
- Child-safe scissors
- Glue stick
- Marker
How to make it
- Lay the bag flat with its bottom flap facing you. The flap becomes the movable jaw.
- Cut out a red mouth, white triangle teeth, a yellow belly, green arms and green spikes.
- Glue the red mouth under the flap. Glue teeth along the edges, keeping the flap free to move.
- Glue on the belly and arms. Attach the spikes along one side of the back.
- Add eyes and draw nostrils and spots. Slip your hand inside the bag to move the jaw.
Paper bag dog puppet
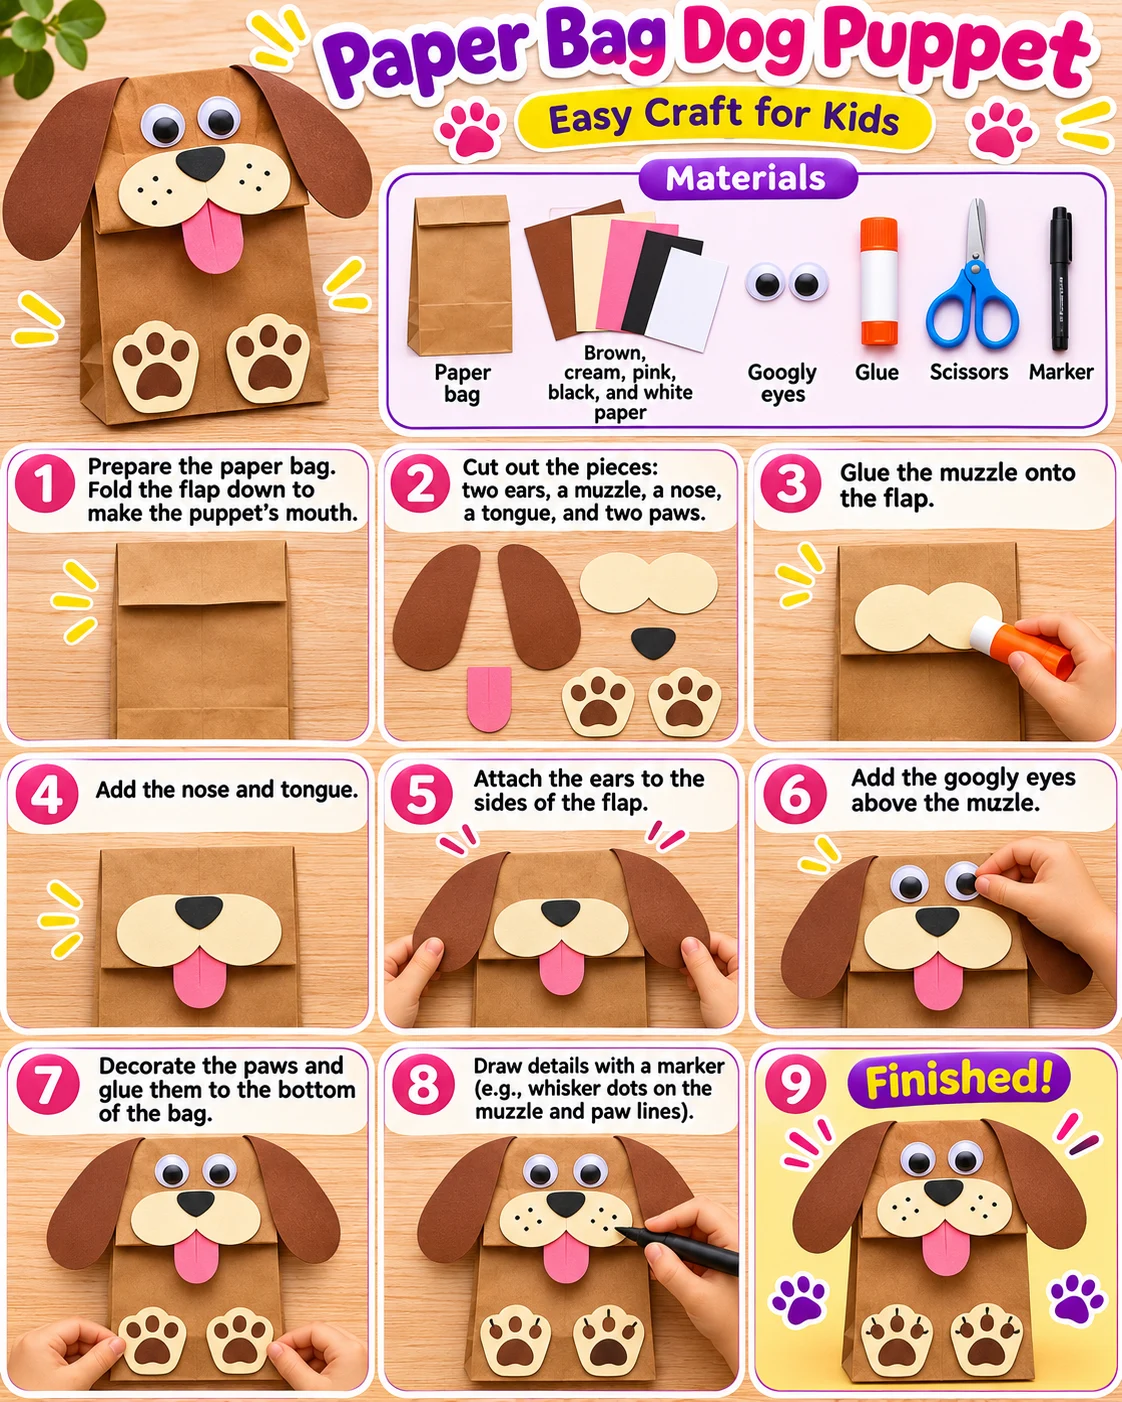
Materials
- Paper lunch bag
- Brown, pink, black and white paper
- Scissors
- Glue
- Marker
How to make it
- Lay the bag flat with the bottom flap facing you.
- Cut paper ears, muzzle, tongue and eyes.
- Glue the ears behind the flap and the muzzle on top. Attach the tongue below the flap so it can open.
- Add the eyes, nose and paws, then draw the face details.
Paper circle caterpillar
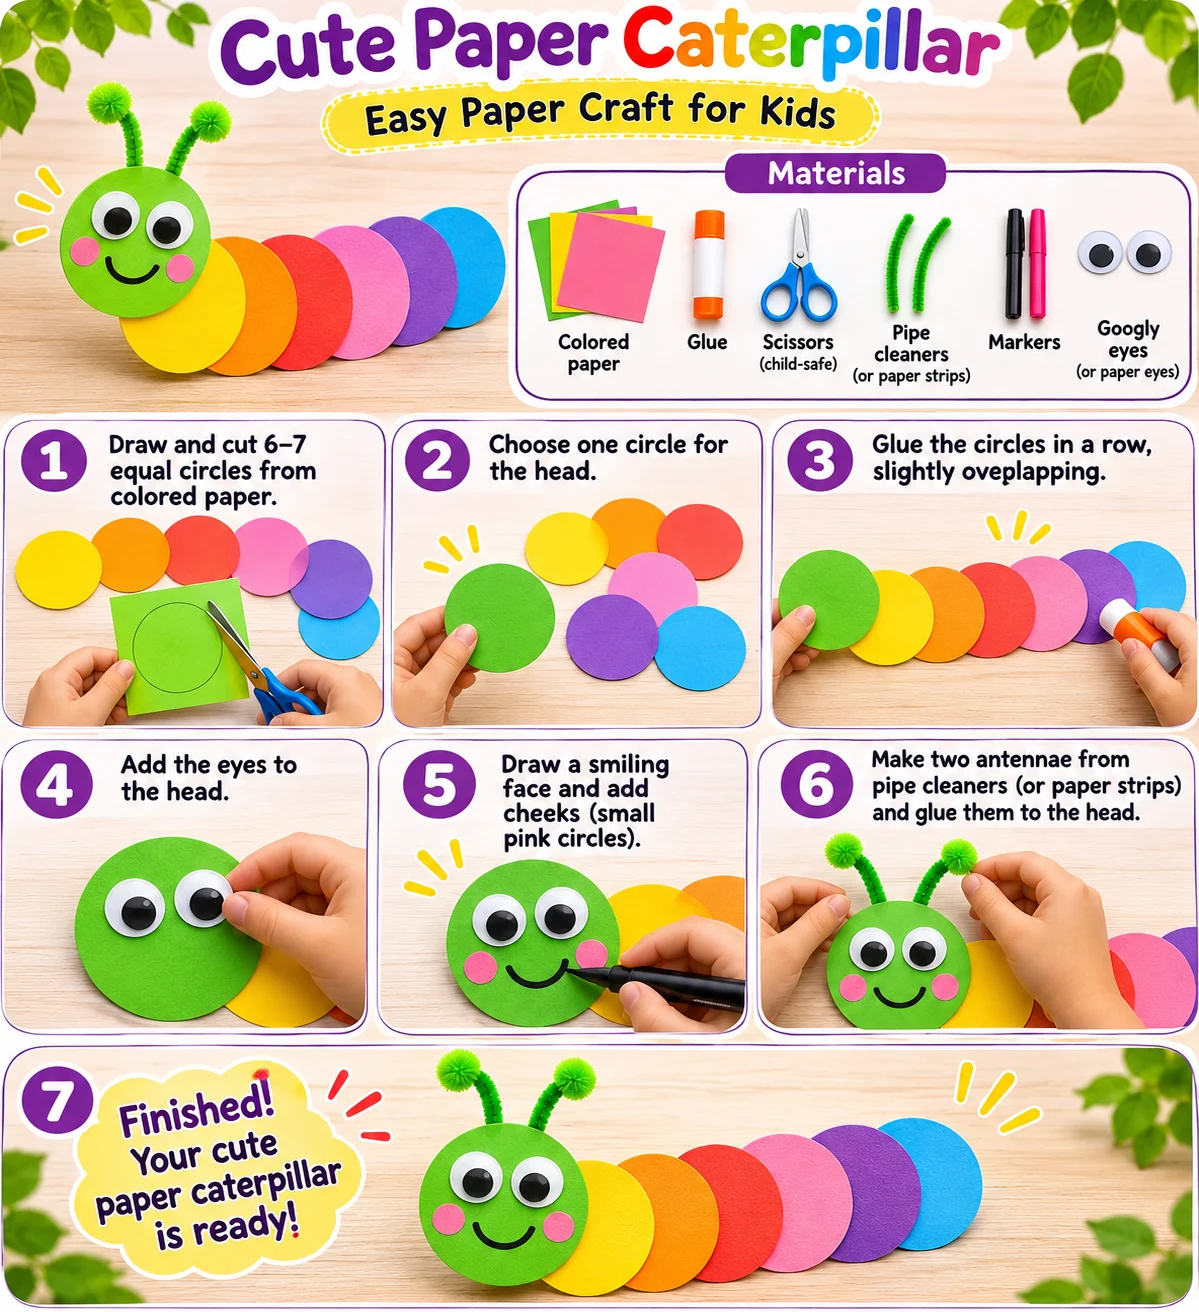
Materials
- Colored paper
- Scissors
- Glue
- Marker
- Paper eyes
How to make it
- Cut six or seven circles in different colors and another circle for the head.
- Overlap and glue the circles in a gently curved row.
- Add eyes and draw a smile on the head.
- Glue the head to the front and add paper antennae.
Pick a project for the actual guests
The ten tutorials above are a menu, not a plan to make ten crafts during one party. Choose one main project after checking how much cutting, folding, and gluing your guests are likely to want. Ask caregivers about support needs and material sensitivities before the event. Do not assume everyone of the same age will need the same help.
Try the chosen project yourself once. Notice the awkward step, how much paper it really uses, and where it must rest while glue sets. Prepare an easier route before guests arrive: drawn details, large ready-cut shapes, or a flat version. Children should be able to choose that route without being labeled the younger or slower group.
A worked supply plan for paper-bag puppets
This example covers one puppet per guest, with two complete spare material kits. It assumes four sheets of colored paper per kit as a generous allowance, not a tested cutting yield. Use scraps for small features and adjust after your practice build. Shared tool quantities are convenience estimates, not safe supervision ratios.
| For one puppet per guest | 6 children + 2 spare kits | 12 children + 2 spare kits |
|---|---|---|
| Clean paper lunch bags: 1 per kit | 8 bags | 14 bags |
| Colored paper: allow 4 sheets per kit | 32 sheets | 56 sheets |
| Glue sticks: 1 per pair + 1 spare | 4 sticks | 7 sticks |
| Shared crayon sets: 1 per 3 children | 2 sets | 4 sets |
| Drying / take-home spaces: 1 per kit | 8 labeled spaces | 14 labeled spaces |
Set out three clear spaces
Use one place for personal material kits, one supervised place for tools, and one place for drying. Keep food and drinks separate from glue and paper. An adult can mark a drying sheet or take-home bag with each guest’s name before making starts. Avoid taking names or photos for online sharing as part of the activity.
If a host needs to welcome arrivals or serve food, arrange who supervises the craft tools during that time. Choose the number and roles of adults around the children and tasks involved; this article does not provide a childcare staffing rule.
A flexible party flow
- Before guests arrive: clear the table, prepare kits, test the demonstration, and place suitable tools with the supervising adult.
- On arrival: let children draw or look at a book while the group gathers. Do not require everyone to wait for a long explanation.
- Start the main craft: show the next useful step rather than the entire project at once. Give each maker choices about color and decoration.
- As children finish: offer an optional paper background, character name, or quiet alternative. They may also stop.
- Before departure: check glued parts, move creations to named carriers, and explain if a project needs more time to set.
Keep finishing times from becoming a competition
A child who finishes first does not need a harder task or a job completing someone else’s work. Offer a small extension or a different quiet choice. A guest who wants to stop halfway can take home their safe unfinished pieces with a short explanation for their caregiver.
Avoid prizes for the neatest or most realistic craft. Displaying different versions together can be enjoyable if the makers agree, but a party does not need a judging round. The aim is an activity guests can participate in, not matching decorations for the host.
Pack away without losing the creations
Before clearing scraps, ask each child what belongs to their project. Fold empty paper bags into simple take-home carriers, or use a clean box for anything raised. Keep wet or fragile pieces separate and upright as needed.
Afterward, note the one material that ran out and the one step that needed more help than expected. That is more useful for a future party than buying a larger assortment of supplies.
Common questions
Which craft should I choose for a mixed group?
Try a paper-bag character or collage with large prepared shapes. Offer different levels of construction while leaving color and decoration choices open.
Do I need supplies for all ten projects?
No. Choose one main craft. The worked quantities are for paper-bag puppets only, with two spare kits.
How long should the craft take?
Timing depends on the guests and preparation. Test it yourself, allow settling and drying time, and offer a way to pause or stop.
Sources & editorial notes
The resources below inform the general approach. The activity instructions, sample words, and planning tables are original Craftiverse suggestions; they have not been clinically evaluated.
- American Academy of Pediatrics: Choosing Safe Art & Craft Supplies
Background on choosing suitable craft materials. Project quantities, timing examples, and adaptations are Craftiverse planning suggestions.
Written by the Craftiverse Editorial Team · Published 21 November 2026. This article has not been reviewed by a clinician. Read our about page or contact us about a correction.